” Ansible is designed with a simple principle in mind: Automation shouldn’t become more complex than the tasks it’s replacing. You should be able to save time and effort through automation.” (RedHat + OpenSource)
Following the previous Introduction blog post on Automation in the Cloud , in this post you can learn how to start learning Ansible with hands-on exercises close enough to the future Cloud reality.
Warm up
Audience
Same audience as in the previous Introduction post, but it’s time to do some hands-on.
Scenario
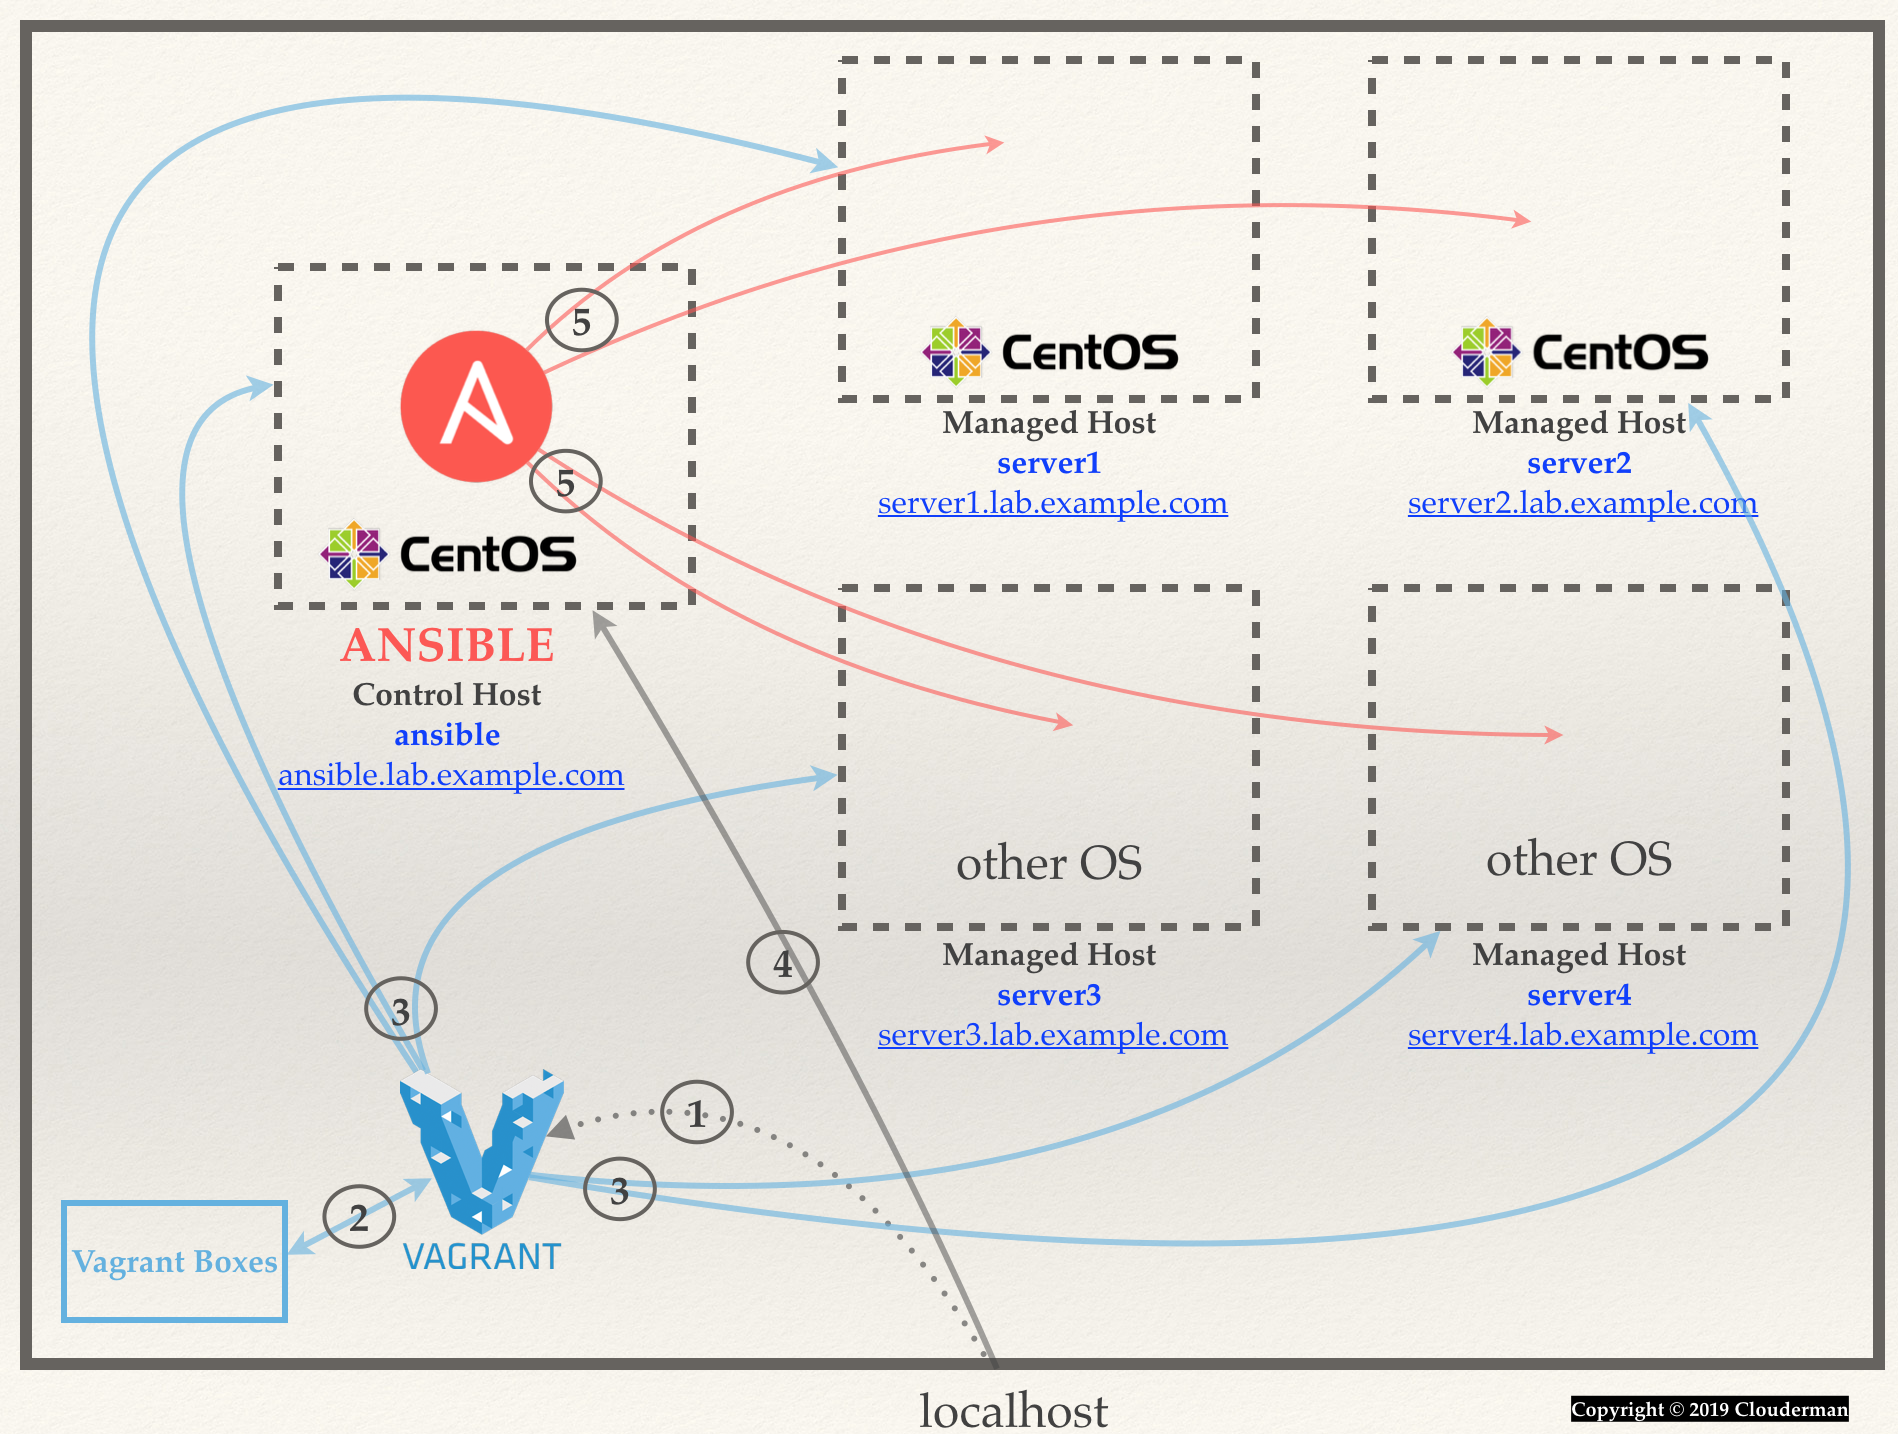
To learn Ansible you need a minimum setup that will simulate real life, let’s call it the Ansible LAB, see the image below describing the lab you are about to build. With this Ansible Lab ready and reproducible within seconds or a few minutes tops, everytime you would like to reset it from scratch, you will be in a very good position to start learning Ansible and play various scenarios from the most basic ones to medium and even complex ones. And all at zero costs.
Difficulty
Some Linux background will help.
Post Type
Hands on: build your Ansible LAB
🎧 Playlist 🎧
- Cassandra Wilson – Billie’s Blues ⭐️ ⭐️ ⭐️
- Fun Lovin Criminals – Passive Aggressive
- Cassandra Wilson – Death Letter
- Fun Lovin’ Criminals – I Can’t Get With That (Schmoove Version)
- Fun Lovin Criminals – Rewind
- Fun Lovin’ Criminals – A Whiter Shade of Pale ⭐️
- The Handsome Family – Far From Any Road
The Ansible LAB
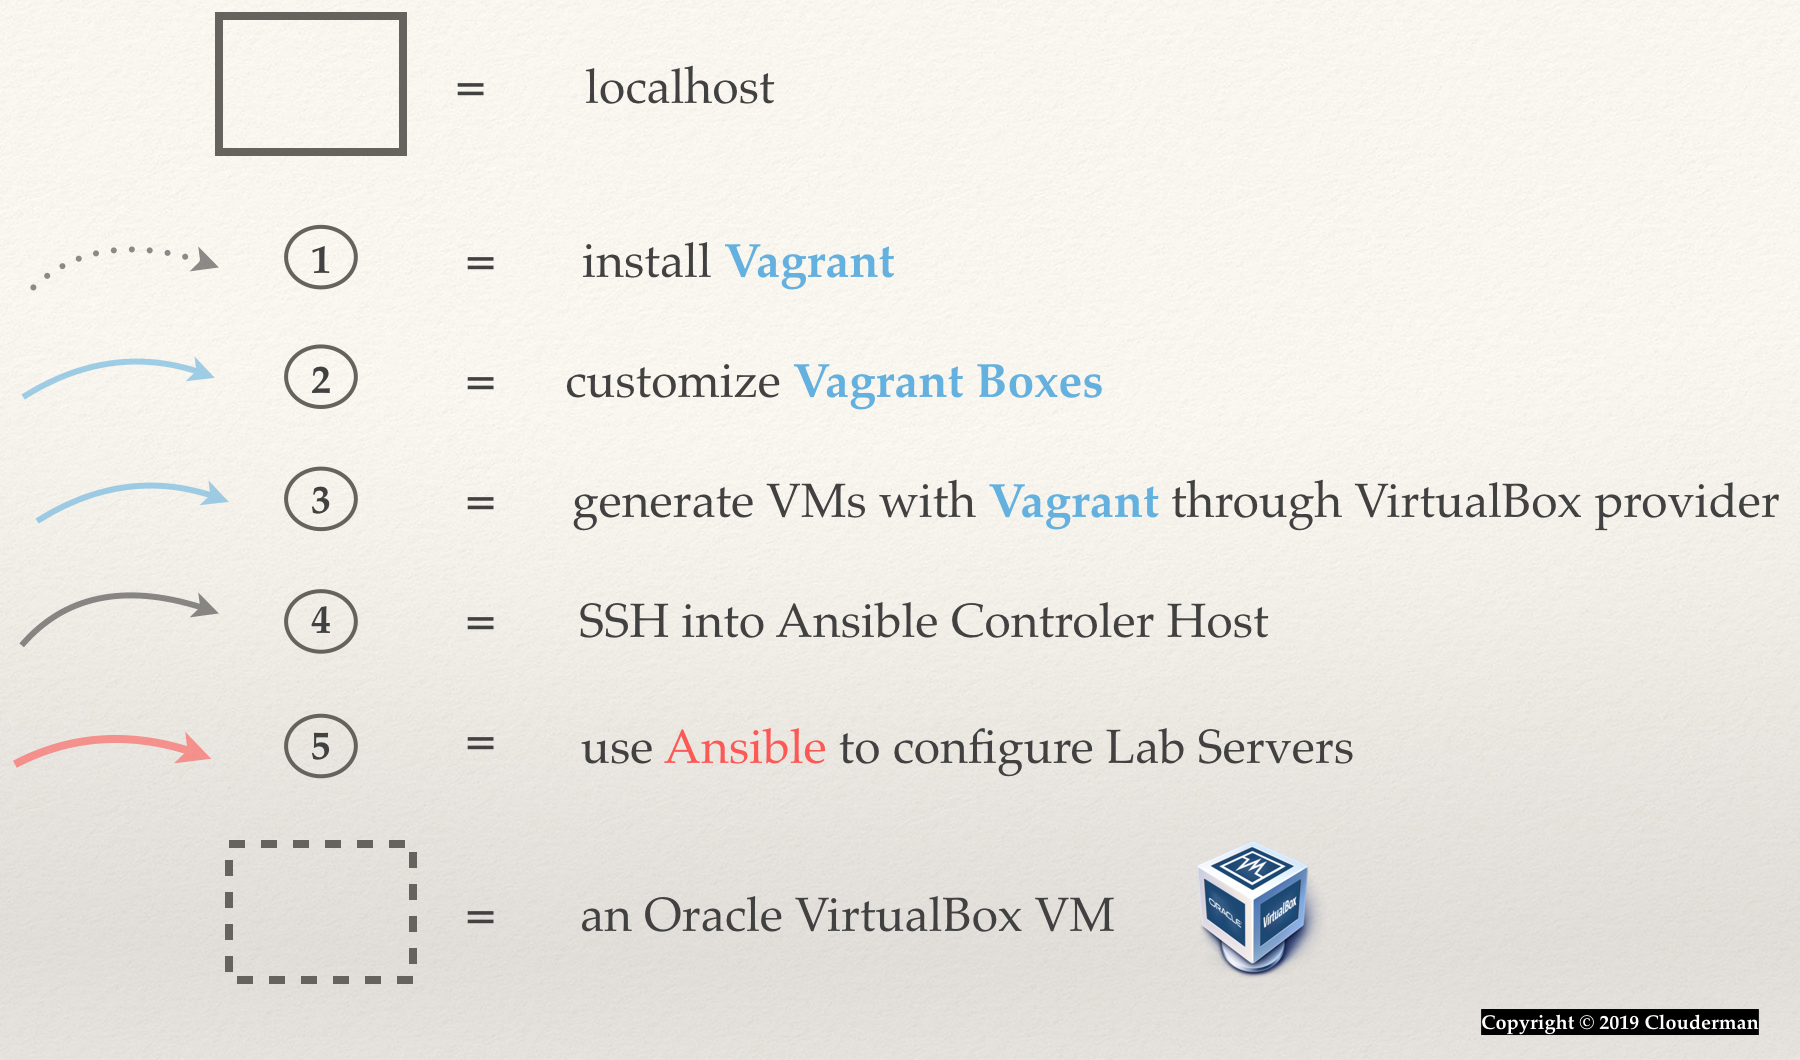
There are 5 steps to build your Ansible LAB
Requirements
To build the Ansible LAB you will need to have the following minimum requirements:
- localhost can be any OS, but I will refer to localhost as a *nix machine. 16 GB RAM and 1 CPU with some storage (SSD will be yummy) will be more than enough to get this LAB up and running every time you need a total reset, within **less than 3 minutes**.
- Vagrant must be installed on your localhost. If this will be your 1st time when you will be using Vagrant, you may take some time to read about the commands mentioned later one, but it should be easy reading and should be straight forward.
- Oracle VirtualBox – Vagrant support many providers (VMware, Hyper-V), I will be using Oracle VirtualBox, it is just perfect for the goal.
- Depending on your localhost OS, you may need to install other additional tools (like for example, if you will be using Windows, a putty and/or a puttygen will be needed). I will leave this part to you, as you’ll go through this Post and install them, accordingly.
Some Housekeeping
- I will be using CentOS 7 for Control Host and to keep it simple, I am going to use the same also for the Managed Hosts. However you may use any OS you would like (including Windows).
- In the Ansible LAB am suggesting 4 Managed Hosts, 4 is a “nice” number, it may be sufficient for most of the scenarios, you may increase/decrease the number of Managed Hosts as needed, also within the hardware boundaries of your “localhost”.
- In order to perform Ansible, you will need to install Ansible on the Control Host and you will be needing a python module available on each Managed Host. Along with that Ansible Control Host will need to be able to login on each Managed Host, therefore a user will be needed.
- To keep it extremely simple, generate a user ansible (call it whatever you like , I will refer to this user from now on as ansible) for all the Lab machines with which you will be able to connect from localhost (but also between the machines, if ever needed) using SSH. The ansible user will be able to ‘sudo to root‘ as you will see later on in the details of the setup. Now, this is somehow redundant, because Vagrant comes already with a user named vagrant that does pretty much the same, but this is just to make a point here: we will be using Vagrant strictly to build the Ansible LAB machines.
- Generate the ansible SSH keys (public and private) by using ssh-keygen (if on a Windows you could use puttygen), name them whatever you like, I will name them so I can refer to them later on, as:
- ansible_ssh_key (the private key)
- ansible_ssh_key.pub
- Generate the ansible SSH keys (public and private) by using ssh-keygen (if on a Windows you could use puttygen), name them whatever you like, I will name them so I can refer to them later on, as:
Configure your localhost hosts file so it will recognize the Ansible LAB machines (use any DNS names you would like), as detailed in the Ansible LAB image I will be referring to the machines as follows :
- Control Host = ansible = ansible.lab.example.com
- Managed Host 1 = server1 = server1.lab.example.com
- Managed Host 2 = server2 = server2.lab.example.com
- Managed Host 3 = server3 = server3.lab.example.com
- Managed Host 4 = server4 = server4.lab.example.com
Step 1 – Installing Vagrant
Nothing really special here, just follow the Vagrant installation steps and guidance and you will be good to go.
! Be sure you will install VirtualBox Guest Additions before moving to next step !!
vagrant plugin install vagrant-vbguest
Step 2 – Customize Vagrant Boxes
Vagrant has a very nice repository of images from which you can start to build your own OS and save it as a Vagrant Box for future reference.
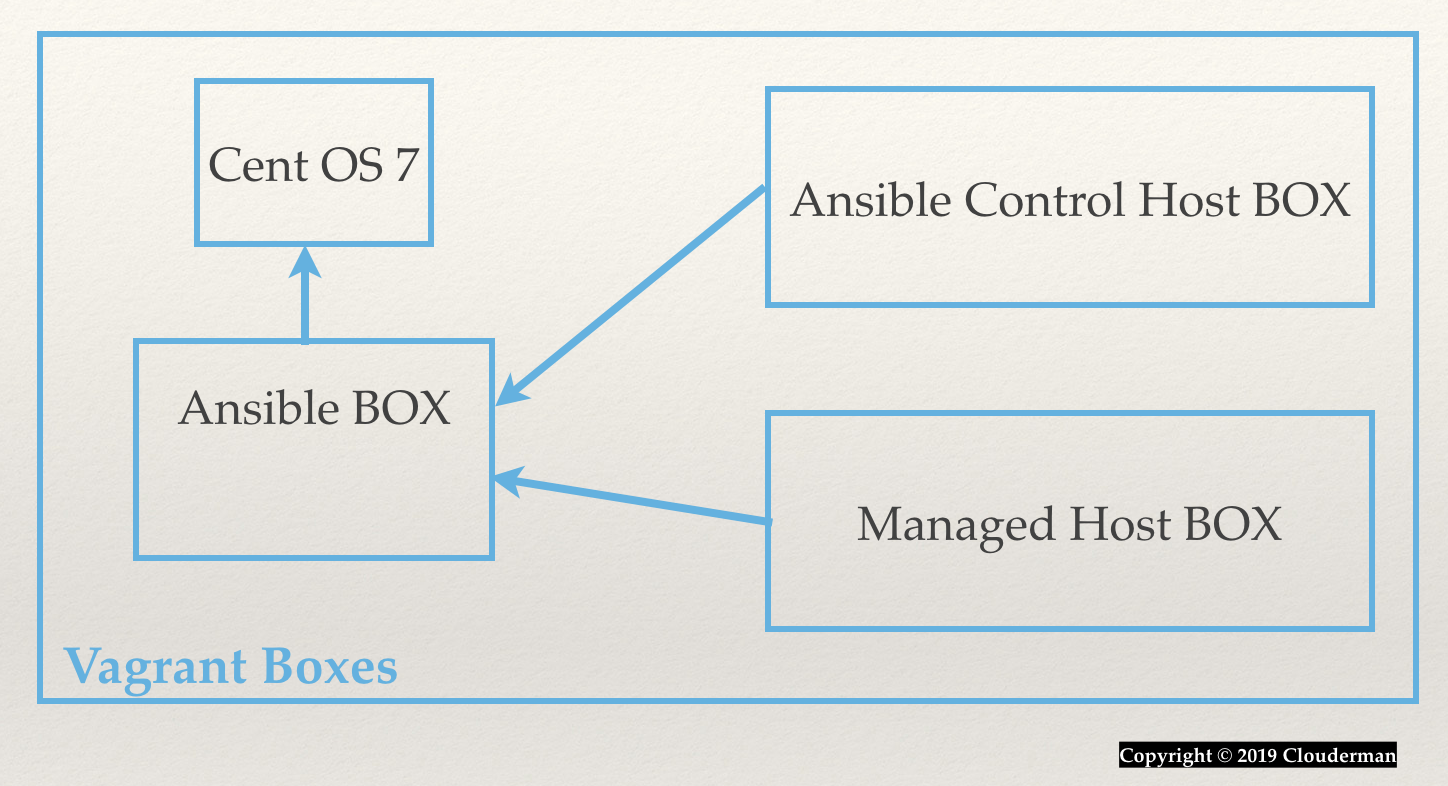
For the purpose of this Ansible LAB we need to build 2 Vagrant boxes:
- Ansible Control Host BOX
- Managed Host BOX
Because I chose to have the same OS (Cent OS 7) for both Ansible Control Host and Managed Host, I can use an intermediary step to build an Ansible Vagrant BOX (Ansible BOX). And based on this Vagrant BOX I will build the Control Host and the Managed Host for the Ansible LAB.
If you know nothing about Vagrant, in a nutshell: Vagrant launches VMs based on a Vagrantfile you will be editing. The syntax within this file is Ruby, but you don’t need to understand Ruby, nor to bother to learn this programming language in case you don’t know it, as the files will be intuitive to use and provisioned in the following, and very easy for you to alter as per your own needs later on.
So, to launch a Vagrant VM, from inside the folder where you created and edited your Vagrantfile, just type:
vagrant up
Build CentOS LAB GENERIC AnsibleBOX
- based on Cent OS 7 here is the Ansible BOX Vagrantfile you will create in a folder of your choice:
Vagrant.configure(“2”) do |config|
 config.vm.box = “centos/7”
 config.vm.provider “virtualbox” do |v|
 v.name = “AnsibleBox”
 end
end
- launch the VM
vagrant up
- validate the VM is up and running
vagrant ssh
- add user ansible to the VM
sudo su –
useradd ansible
passwd ansible
- allow user ansible to sudo to root by creating an ansible file
vi /etc/sudoers.d/ansible
- and inserting the following line into it
ansible ALL=(ALL) NOPASSWD:ALL
- check your user ansible is configured properly by running successfully:
exit
sudo su – ansible
sudo su – root
- edit your hosts file /etc/hosts with the IPs and DNS names of your machines, here is a sample
192.168.50.100 ansible ansible.lab.example.com
192.168.50.101 server1 server1.lab.example.com
192.168.50.102 server2 server2.lab.example.com
192.168.50.103 server3 server3.lab.example.com
192.168.50.104 server4 server4.lab.example.com
- upload the ansible SSH keys; since you already installed VirtualBox Guest Additions, you can just copy the SSH keys in your local directory and vagrant upthe machine again. Vagrant will always rsync by default your current folder into a /vagrant folder on your VM
vagrant halt
cp /ansible_ssh_key .
cp /ansible_ssh_key.pub .
vagrant up
- copy ansible SSH keys and make sure they are in correct mode and owner (it should be 0600 with ansible:ansible)
vagrant ssh
sudo cp /vagrant/ansible_ssh_key /home/ansible
sudo cp /vagrant/ansible_ssh_key.pub /home/ansible/
sudo su – ansible
sudo chown ansible:ansible ansible_ssh_key
- inject ansible public SSH key (ansible_ssh_key.pub) to assure you can SSH into this Ansible LAB machine from anywhere
cd
mkdir .ssh
chmod 0700 .ssh
mv ansible_ssh_key.pub .ssh/
touch .ssh/authorized_keys
chmod 0600 .ssh/authorized_keys
cat .ssh/ansible_ssh_key.pub .ssh/authorized_keys
cat .ssh/authorized_keys
- make sure you install python (on CentOS 7 box image is already installed)
sudo yum list installed python
- should you consider other utils you would always like to have them up and ready on your empty Ansible LAB VM, that’s a good place to install them (not much to think of,but maybe an ifconfig , a vim, a git, if you are into vi editor maybe some default indentation for YAML, maybe a nano etc)
- now that we’ve configured our Anible Generic BOX let’s save it and prepare it for future usage:
vagrant package –output AnsibleBox.box
vagrant box add AnsibleBox AnsibleBox.box
- At this point you should have in your Vagrant Boxes on your localhost AnsibleBox ready for future usage
vagrant box list
Build Ansible Control Host BOX
- bring up a VM based on the previously built AnsibleBOX
Vagrant.configure(“2”) do |config|
 config.vm.box = “AnsibleBox”
 config.vm.network “private_network”, ip: “192.168.50.100”
 config.vm.hostname = “ansible.lab.example.com”
 config.vm.provider “virtualbox” do |v|
 v.name = “Ansible”
 end
end
- SSH into the VM and switch to ansible user
vagrant up
sudo su – ansible
- add ansible ssh private key to the authentication agent; default Ansible method of connection to Managed Hosts is SSH
ssh-agent
eval $(ssh-agent)
ssh-add ~/ansible_ssh_key
- to make it available for each reboot in a consistent way insert the below in let’s say the ~/.bashrc for example:
if [ -z “$SSH_AUTH_SOCK” ] ; then
 eval `ssh-agent -s`
 ssh-add ~/ansible_ssh_key
fi
- install Ansible for CentOS:
sudo yum search epel
sudo yum install epel-release
sudo yum install ansible
sudo yum install python-pip
- test Ansible is installed
ansible –version
- at this point you have a fully Control Host Customized for your LAB, save it as a Vagrant BOX for future reference:
vagrant package –output AnsibleLabControlHostBox.box
vagrant box add AnsibleLabControlHostBox AnsibleLabControlHostBox.box
- list the Vagrant Boxes, you should find the two Vagrant Boxes you built so far:
vagrant box list
Build Ansible Managed Host BOX
As mentioned already a few times so far, only CentOS was used in this Ansible LAB, and as such for Managed Host, we can use as the Vagrant Box, the already created CentOS LAB Generic AnsibleBox.
Follow similar steps to build Vagrant BOXes for other OS you would like to use as Managed Host or just download them from repo in your Vagrant BOXes on your localhost for easy access ( see next step).
Step 3 – Generate the Ansible LAB VMs:
Vagrant is powerful enough and instead of generating the VMs individually, you can automate everything by simply creating the following Vagrantfile ( in a folder of your choice, call it Ansible-LAB ):
servers=[
 {
 :hostname = “ansible.lab.example.com”,
 :ip = “192.168.50.100”,
 :box = “AnsibleLabControlHostBox”,
 :name = “AnsibleControlHost”
 },
 {
 :hostname = “server1.lab.example.com”,
 :ip = “192.168.50.101”,
 :box = “AnsibleBox”,
 :name = “Server1”
 },
 {
 :hostname = “server2.lab.example.com”,
 :ip = “192.168.50.102”,
 :box = “AnsibleBox”,
 :name = “Server2”
 },
 {
 :hostname = “server3.lab.example.com”,
 :ip = “192.168.50.103”,
 :box = “AnsibleBox”,
 :name = “Server3”
 },
 {
 :hostname = “server4.lab.example.com”,
 :ip = “192.168.50.104”,
 :box = “AnsibleBox”,
 :name = “Server4”
 }
]
Vagrant.configure(2) do |config|
 servers.each do |machine|
 config.vm.define machine[:hostname] do |node|
 node.vm.box = machine[:box]
 node.vm.hostname = machine[:hostname]
 node.vm.network “private_network”, ip: machine[:ip]
 node.vm.provider “virtualbox” do |v|
 v.name = machine[:name]
 end
 end
 end
end
Now, to build the Ansible LAB for the 1st time, all you have to do ( while in the Ansible-LAB folder ) is to run:
vagrant up
Within a few minutes tops, you should have the Ansible LAB up and running and ready to use.
To stop (power off gracefully ) the Ansible LAB just
run ( while in the Ansible LAB folder ):
vagrant halt
To bring the Ansible LAB back to its latest status, run again:
vagrant up
To destroy everything:
vagrant destroy
Step 4 – SSH into the Controller Host
From your localhost SSH with ansible user into the ansible Control Host ( aka ansible.lab.example.com )
ssh -i ~/ansible_ssh_key ansible@ansible
STEP 5 – Start learning Ansible by using it
Create a working directory and a test one:
mkdir -p work/test-lab
cd work/test-lab
Create an ansible.cfg file:
[defaults]
inventory = inventory
[privilege_escalation]
become=true
become_method=sudo
become_user=root
#become_ask_pass=false
Create an inventory file:
server1.lab.example.com
server2.lab.example.com
[webserver1]
server1.lab.example.com
[webserver2]
server2.lab.example.com
[web-servers]
server3.lab.example.com
[db-servers]
server4.lab.example.com
Run an Ansible ping test on your Ansible LAB Machine Hosts:
ansible all -m ping
If all ok it should output
server1.lab.example.com | SUCCESS = {
“changed”: false,
“ping”: “pong”
}
server3.lab.example.com | SUCCESS = {
“changed”: false,
“ping”: “pong”
}
server2.lab.example.com | SUCCESS = {
“changed”: false,
“ping”: “pong”
}
server4.lab.example.com | SUCCESS = {
“changed”: false,
“ping”: “pong”
}
Good luck in Learning Ansible.
Check again soon: by the time you will get familiar with Ansible ( working with dynamic Inventories, Ansible roles and so on … ), I hope to have some other Blog Posts ready, in which you could start combining Ansible with some of the major Cloud vendors and maybe even integrating with some other flexible tools, all to achieve IaaC ( Infrastructure as a Code ), Automation in the Cloud so you can get one step closer to a Continuous Delivery pipeline and all the other mandatory steps mentioned in the Introduction Blog Part.